Showing posts with label mission report. Show all posts

Wednesday, June 13, 2018

MISSION 03 - RESCUE THE REBEL OPERATIVES

Mission Briefing:
“We’ve received an encrypted message from one of our Rebel Operative teams in the Argus system. They were engaged in covert reconnaissance of Imperial facilities in a nearby asteroid field.
Their HWK-290 has sustained heavy damage to its weapons and hyperdrive. They won’t make it back in one piece with their findings unless we scramble some fighter cover.
There’s a good bet the Empire has already dispatched fighters to intercept them too”.


Fury Squadron Pilots assigned to mission:
Mission Report:
Fury Squadron, lead by FO Bola Hujaan (Fury Leader), sped to the location of the last broadcast coordinates of the stricken HWK-290. It didn't taken long for them to zero in on the Rebel Operatives, a swarm of TIE/LNs in close pursuit.
Fury Leader made straight for the HWK, while Fury Two moved to intercept a flight of TIEs. Fury Three and Fury Four flew in tight formation headed for the other flight of TIEs.
There was little Fury Squadron could do but watch the HWK-290 pummeled by incoming laser fire and within moments her shield's were blown. The pilot of the HWK sped for the line of friendly fighters while frantically trying to bring it's damaged sensor array back on line.
Just in time Fury Squadron engaged the TIE swarm, buying the HWK some valuable time but the stricken craft was still taking serious fire. At this same instant Fighter Command alerted Fury Leader to the arrival of a lone enemy TIE/IN, an enemy whose signature was known to the Parmel Sector Alliance Fleet. Fury Squadron ID'ed the red TIE/IN as Major Volsh Krin aka, 'Widow Maker', an elite Imperial pilot credited with nearly 20 Rebel kills.
Widow Maker fearlessly charged into the dogfight, targeting the slow moving Y-wing of Fury Two. Fury Two was battered by the accurate strafing of Widow Maker and it looked like the Y-wing would be in serious trouble, it's own ion cannon unable to tag the enemy ace.
The HWK continued it's escape flight, a pair of TIEs close on it's six. The TIEs continued to blow holes in the HWK and Fighter Control assumed the worst for the operatives.
Fury Three and Fury Four were keeping as many TIEs as they could busy while Fury Leader and Fury Two took evasive actions against Widow Maker. Fury Two was unable to shake the elite TIE/IN forcing Fury Leader to make a risky maneuver in an attempt to come to his aid. The move paid off landing Fury Leader right on top of Widow Maker, denying the Imperial ace a target.
Miraculously the HWK continued it's flight, the X-wings managing to bring down another of it's pursuers, forcing the sole pursuing TIE/LN to pull out of the race, letting the operatives make their escape.
Fury Leader gave the order for Fury Squadron to concentrate all fire on Widow Maker. In the exchange no pilot was able to land a hit on the ace Imperial with Krin managing to evade all incoming attacks. Fury Four did manage to lock and fire a flechette torpedo at the TIE/IN which avoided the warhead proper but got caught in the blast. It did little to deter Widow Maker who bore down on Fury Leader with accurate fire.
With the arrival of more TIE/LNs and with the squadron having been unable to land even a single strike on the enemy ace, Fury Leader ordered a withdraw, much to Fury Three's chagrin as he had positioned an attack run on Widow Maker. 
In quick time Fury Squadron made the jump to hyperspace, only Fury Leader remained behind, ensuring his squadron withdrew safely. With a swarm of TIEs and the infamous Widow Maker closing on him rapidly, Fury Leader turned to home, punched the hyperspace coordinates making the jump himself.


Mission Conclusion:
“The operatives have safely retreated, bringing us valuable intel of the Argus System. We must mount another operation to further investigate in force.”

With the aid of Fury Squadron the Rebel operatives escaped safely and have now reunited with Parmel Sector Alliance Fleet. The information they retrieved will prove imperative to further operations in the sector.
Fury Squadron has positively identified the presence of Major Volsh Krin, known as 'Widow Maker', an Imperial ace credited with 18 Rebellion pilot kills. The appearance of Krin's distinctive red TIE Interceptor does not bode well for further actions in the Aturi Cluster and Fury Squadron can be assured it will not be the last time they meet him.
  • PRIMARY: The HWK-290 must escape from your setup edge. SUCCESS
  • BONUS: If all Elite enemy ships are destroyed, all players gain 2XP. FAILED
  • BONUS: The pilot who performs the most protect actions on the Rebel Operatives’ HWK gains 2XP. If two or more players are tied, all tied players gain 1XP. FAILED
Squadron XP Earned: 4XP

Confirmed Kills:
  • FO Bola Hujaan "Barrage" - Fury Leader (X-wing) - 2 TIE/LN
  • FO Tycho Seneca "Psycho" - Fury Two (Y-wing) - 1 TIE/LN
  • FO Maath Beto "Frills" - Fury Three (X-wing) - 2 TIE/LN
  • FO Chu Bantos "Chubs" Fury Four (X-wing) - 1 TIE/LN
 Recommendations:
  • FO Tycho Seneca "Psycho" - Fury Two (Y-wing) - for suffering the most enemy fire (+1XP)
  • FO Maath Beto "Frills" - Fury Three (X-wing) - for his commitment to re-engage (+1XP)
  • FO Chu Bantos "Chubs" Fury Four (X-wing) - for tagging the most enemies (+1XP) 
Decorations:
  • FO Bola Hujaan "Barrage" - Fury Leader (X-wing) - Awarded the rank of Lieutenant and credited the title of Ace
  • FO Tycho Seneca "Psycho" - Fury Two (Y-wing) - credited the title of Ace
  • FO Maath Beto "Frills" - Fury Three (X-wing) - credited the title of Ace


Saturday, May 26, 2018

MISSION 02 - CAPTURE THE OFFICER

Mission Briefing:
“Our operatives have been watching the Imperial starport traffic coming in and out of the Nulan system for weeks, and we have managed to decrypt some holocomm messages.
The local garrison is due for an inspection this week by Moff Lankin. We have his shuttle’s flight path, so we can intercept and capture him. This should provide us with some valuable intel and deal the local Imperial forces a demoralizing blow.”


Fury Squadron Pilots assigned to mission:

Mission Report:
Fury Squadron, under FO Bola Hujaan (Fury Leader), followed the jump co-ordinates provided, finding themselves in a relative position to launch their attack on the Imperial Lambda shuttle's flight path. Fury Two and Fury Three were to spearhead the attack on the shuttle while Fury Leader and Fury Five moved in on an opposing trajectory.
The Moff's shuttle and two of it's TIE/LN escorts immediately moved to intercept Fury Two and Fury Three, while a third TIE/LN broke off towards Fury Leader. Fury Three suffered the bulk of the initial attack, with the shuttle gaining a target lock, and directing it's escort's fire. Fury Three's shields were depleted in the exchange but the shuttle suffered at the hands of Fury Two's ion cannon.
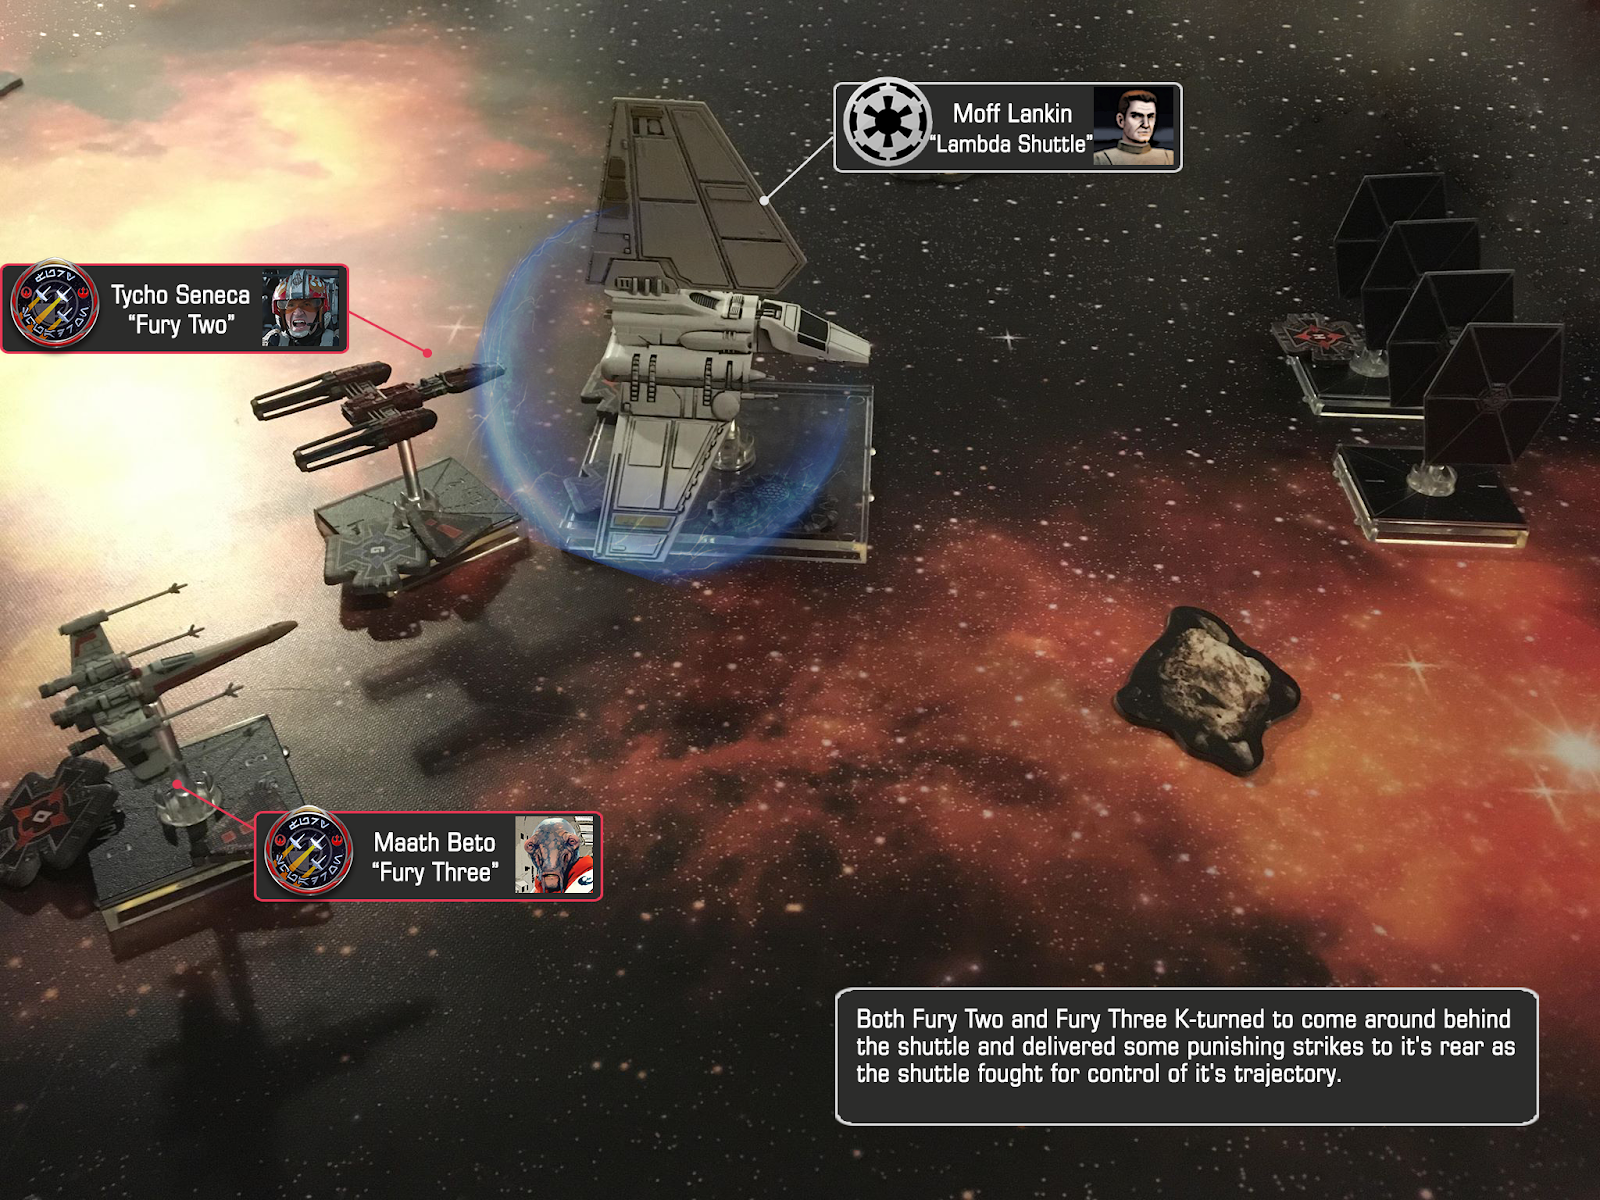
Both Fury Two and Fury Three K-turned to come around behind the shuttle and delivered some punishing strikes to it's rear as the shuttle fought for control of it's trajectory.
Meanwhile, Fury Leader faced off with the lone TIE/LN, while directing Fury Five to assist with the shuttle. Fury Five launched a proton torpedo at long range taking out the last of the shuttle's shields and knocking out it's sensor array. This opened up the opportunity for Fury Two to deliver enough damage to knock the shuttle out for good; it powered down and drifted in the void. Hostile blips appeared on the radar.
Fury Leader entered a dogfight with his elusive TIE/LN target, pulling a maneuver that brought it dead in his sights, when a new flight of TIE/LNs joined the battle from Fury Leader's six. Heavily outgunned Fury Leader cut hard to avoid their firing arcs and sped towards his squadron.
A new threat faced the rest of Fury Squadron as well. A TIE/SA bomber moved steadily towards them locking onto Fury Five. The TIE/SA was forced to avoid a stray asteroid, giving Fury Two and Fury Three the opportunity to take down a TIE/LN and move into position on the bomber. Fury Five now relentlessly pursued the TIE/SA and was joined by Fury Two. The bomber pilot was skilled but could do little to shake Fury Squadron. Fury Two kept the bomber ionised and another accurate torpedo from Fury Five knocked out it's missile pod, rendering it near useless.
Fury Leader picked off a TIE/LN that had collided with the immobile shuttle, turning to assist as the flight of reinforcements bore down on Fury Two. The TIEs concentrated their fire on Fury Two delivering a number of debilitating hits, a fire starting within the cockpit of the rattled Y-wing. Fury Leader directed Fury Two while he struggled to put out the cabin fire and avoid anymore incoming attacks. Fury Leader ordered Fury Three and Fury Five to turn on the intercepting TIE/LN flight and for Fury Two to keep on the TIE bomber.
In doing so Fury Five drew the incoming fire off Fury Two, giving the Y-wing the chance to finish the bomber, which exploded spectacularly, it's payload still onboard. The X-wings made short work of the remaining TIE/LNs, allowing Fury Leader to signal Fighter Command that the shuttle was secure. Fury Squadron was given the all clear to head home. Mission successful!


Mission Conclusion:
“Now that the Moff Lankin is in the hands of our operatives, we should have some new intelligence for you shortly.” 

A prize crew boarded the officer's shuttle, placing Moff Lankin and his men under arrest. The disabled craft was towed out of system by a corvette, which made a jump to rendezvous with the Parmel Sector Alliance Fleet. The Moff's knowledge of Imperial forces will prove very useful in the campaign ahead.
  • PRIMARY: Capture the Imperial Officer. SUCCESS
  • BONUS: When the primary objective is complete, all players gain 1XP for each
    squad of enemy ships that did not arrive. 2x 1XP SUCCESS
Squadron XP Earned: 9XP

Confirmed Kills:
  • FO Bola Hujaan "Barrage" - Fury Leader (X-wing) - 2 TIE/LN
  • FO Tycho Seneca "Psycho" - Fury Two (Y-wing) - 1 TIE/LN, 1 TIE/SA bomber
  • FO Maath Beto "Frills" - Fury Three (X-wing) - 1 TIE/LN
  • FO Wexx Lancer - Fury Five (X-wing) - 2 TIE/LN
 Recommendations:
  • FO Tycho Seneca "Psycho" - Fury Two (Y-wing) - for disabling the shuttle. (+1XP)
  • FO Wexx Lancer - Fury Five (X-wing) - for his accurate torpedoes. (+1XP) 

Friday, May 11, 2018

MISSION 01 - LOCAL TROUBLE

Mission Briefing:
“Welcome to the Outer Rim, pilots. Our convoy is currently en route to a hidden Rebel Base in the Parmel Sector, and you’ll be on escort duty until we arrive. We’ve picked up a group of enemy  signals in the nearby asteroid field; likely an Imperial patrol. Intercept those ships, and keep them away from the convoy until we can execute a hyperspace jump to ensure our base remains hidden.
Good luck!”

Fury Squadron Pilots assigned to mission:
Mission Report:
Fury Squadron encountered an Imperial patrol consisting of two formations of TIE/LN on an intercept trajectory course with the Parmel Sector Alliance Fleet convoy, en-route to Savior Base. Fighter Command's orders were to intercept the enemy patrol and give the convoy time to make a short hyperspace jump to ensure Savior Base remained hidden. 
Fury One and Two quickly entered a dogfight with a pair of TIE/LN, while Fury Three and Four drew away the larger enemy formation which broke up around some asteroids. 
Fury Three and Four turned to engage the pursuing TIE/LN but found themselves heavily outgunned.
Fury One and Two were getting the better of the TIE/LN element, having downed an enemy and were positioning to take down the last, when a pair of TIE/IN appeared suddenly on Fury One's six. Fury One attempted to shake the Interceptors at speed but they pursued, exchanged fire, and Fury One was hit and experienced a thrust control fire. Fury Two was engaged with the remaining TIE/LN on an opposing trajectory. Fury One performed a K-turn to reengage the TIE/INs alone, but was forced to eject when he took a barrage of accurate incoming fire.
The TIE/INs having dispatched their prey turned to find new targets, one pursuing Fury Two's Y-wing and the other moving on Fury Three. Fury Two moved to join with his remaining squad members, TIEs in close pursuit.
Meanwhile Fury Three and Four were locked in a dogfight with the second element of TIE/LN. Both pilots had managed to down an enemy and were engaged with another TIE/LN when more appeared from behind, on course to intercept the approaching Fury Two.
The engagement with the remaining TIE swarm was furious and a close run thing. Fury Four got caught in heavy enemy crossfire and took considerable damage but managed to hold it together.
Fighter Command eventually gave the all clear and Fury Squadron were able to withdraw. The mission was a success, with the rookie pilots proving themselves in a difficult engagement. Fury One was picked up by a rescue craft before the convoy made the jump, the loss of a snub-fighter, a small price to pay for the ensured preservation of Savior Base.


Mission Conclusion:
“Great work pilots! Our convoy is safe from harm. Now we can begin operations against the Empire in this star system”

Although the location of our base remains hidden, the Empire is now aware of Rebel forces in this sector, and will most likely increase patrols in response. The battle for the Aturi Cluster has began!
  • PRIMARY: Engage Imperial Forces: At least one Rebel ship must survive, and remain in play at the end of Turn 10. SUCCESS
  • BONUS: If all Imperial ships are destroyed, all players gain 1XP FAILED
  • BONUS: If no Rebel ships are destroyed, all players gain 1XP FAILED
Squadron XP Earned: 4XP

Confirmed Kills:
  • FO Bola Hujaan - Fury One (X-wing) - 1 TIE/LN
  • FO Tycho Seneca - Fury Two (Y-wing) - 2 TIE/LN
  • FO Maath Beto - Fury Three (X-wing) - 2 TIE/LN
  • FO Chu Bantos - "Chubs" Fury Four (X-wing) - 1 TIE/LN
 Recommendations:
  • FO Chu Bantos "Chubs" - Fury Four (X-wing) - for tagging the most enemies. (+1XP)